Showing posts with label Ana White. Show all posts

Monday, March 11, 2013

How to Make DIY Blackout Curtains

Remember back in February when I posted about my snow day project?

It's still not done.

Not the curtains. I finished those up in four-ish days working during naps and after Norie was in bed.

That sounds really quick now, but at the time it felt like forever. I ran out of thread and bent two needles including one as I back-stitched the very last seam of the very last curtain.


Grrr.

I even hung them, as long as you count thumb tacking them to the wall hanging them.

I had to. Norie will not sleep in a well lit space and snow plus lots of windows equals a super well lit space.

The part I can't get done is the curtain rods. I'm way too cheap to buy them so I'm going to spray paint some EMT (à la this tutorial) and add some finials you might recognize, but it's been too cold.

No curtain rods means no curtain reveal, but since my blog buddy, Crystal, (like my real, bi-directional blog friend who knows who I am) wanted to know how I made them I figure I can give you the run down on the sewing part of the process and how cheaply I made them.

I had been trying to figure out what I was going to do for curtains in the play room for a while. The room could seriously use some temperature moderation (it has two huge windows and no heating vents) and I knew eventually the light factor would be become an issue with Norie's 7pm bedtime. I found some king sheets on super clearence at Target and bought two sets (I checked the dimensions listed on the package and did some mental math to figure out how many I needed to make six 84" curtains). They were $11.38 each. I couldn't wait to chop them up.


I used Ana White's Tab Top Curtains which I've done before, but this time I added the blackout fabric. I got it for a steal too. No really, 60% off home decor fabrics at JoAnn's with a President's Day coupon. Since I needed 14 yards of the stuff and it usually runs $6.99 a yard I saved like 60 bucks.  My total was only $42.65 including tax. Woot! I bought so much they put it back on a roll for me and I had to unroll it on the living room floor to cut it.


I didn't have to make any changes to Ana's Tab Top Curtain Plan to line them. I just cut the blackout fabric into 84" sections and lined the curtains with them. To make sure I sewed the blackout fabric in the right place I folded the fabric over 5/8" (the plan says 1/2", but I have this thing about 5/8" so I guess technically I made a tiny change) at the top and sides and ironed it. Then I folded the top down 4" and ironed it to make a crease to follow.


When you unfold it will look like this.


I laid the blackout fabric up next to the crease line and even with the fabric I folded over so that it would be inside the finished edge, but not all folded up in the finished edge. Hopefully that makes sense. If not, let me know.


I took a close up so you could see what I mean.


Then I just folded the fabric over again around the blackout fabric and pinned and stitched it at like 1/2" because I'm a little neurotic and I like finishing seams like that to be 1/8" from the edge instead of a 1/4".


I did the same thing on the other side and just wrapped the blackout fabric in the same basic way in the top and bottom hems.


Sheets - $11.38 x 2= $22.76
Blackout fabric = $42.65
Thread (because I ran out and had to buy more) = $3.22

Total = $68.63

That's only $11.44 a curtain. Austin says I should figure in my time and they would become really expensive, but DIY is meant for people who have more time than cash, right?

Wednesday, February 27, 2013

Flat Wall Book Holders

Here's another flashback project post. I really love these shelves so I'm not exactly sure why I never posted about them. They hold a ton of books, fill some wall space, and we made them out of scraps from the Dream Dollhouses.


We used these plans from Ana White to make two 24" shelves and one 36" shelf. Yes, Austin helped with this building project. Usually I'm way to controlling to get help, but I was pretty pregnant at the time and rational choices had to be made. If only I was that functional all the time I we would probably get more done.


To attach them to the wall we just screwed them into the studs (after pre-drilling with a counter sink bit).

The whole project took maybe an afternoon and most of that was spent waiting for the paint to dry.

And yes, I'm prepping for a full nursery reveal someday soon. I'm shooting for before Norie's first birthday. :)

Monday, February 4, 2013

DIY Train Table I Made from Free Plans

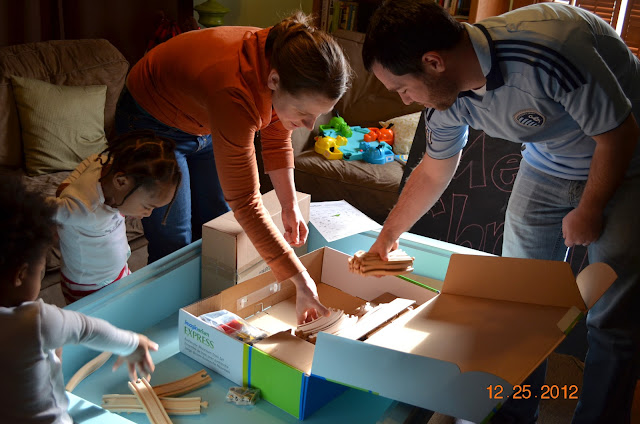
I meant to post about this before Christmas, but since I just barely got it finished (like I requested a five minute warning to make sure I got it in off the porch and hidden in plain sight as a coffee table on Christmas Eve barely got it finished) I didn't get any pictures taken. I also failed to take any while it resided in my living room until it was picked up by my in-laws.
Thank goodness Grandma was wielding her camera on Christmas morning or I'd have nothing.


That's it in the background. Isn't it cute?


Are you as distracted as I am by the adorable father daughter moment happening in the foreground?

So yeah, basically I hid the table in plain sight not four feet from the present opening extravaganza and my nieces had no idea until they got a train set. They were pretty excited it. 


When we said we should set it up, they were like, "where?" and I was all, "HERE!"


Note to self: train sets are super complicated. With four adults helping I think we got it done in like half an hour.


The only changes I made from Ana White's free Mom's Train Table plans were skipping the bottom shelf and cutting half circles on either side for opening the top. I wanted it to be flat so you could set things on top without them running in to handles, but in hindsight it also means you can easily lose the balls from your Hungry Hungry Hippos game down the holes.

I painted it aqua at their mom's request and I love the color. I distressed it a bit and stained the bare parts. I should have taken some photos of the finish, but I didn't.  I also painted the opposite side of the top with chalkboard paint so the girls can draw when they aren't busy playing with trains.

Sorry I don't have a better full table shot. I'll try to update when I get one.

UPDATE: My wonderful sister-in-law sent me a photo.

Monday, February 27, 2012

Tab Top Curtains made from Ana White's Free Plans

I started a project and finished it this weekend. That's one whole thing I can check off the To-Do List.

  • Put up actual curtains in the dining room.


Check.

No, the color is not off in the picture. The walls are actually that kind of sick green yellow, hence "Paint the dining room" is also on the To-Do List. I did, however, take this picture with my phone before I left for work this morning. Hopefully I'll get some glamor shots of them this weekend or maybe an evening now that the sun is staying up a little later in the evening.

I made them myself for $10 using Ana White's Tab Top Curtain instructions and fabric I found on clearance at Walmart for $2 a yard.

They are amazing and easy. I think I know how I'm making the curtains for the nursery and the office/guest room. Which has an actual bed frame now. I'll post with it when my parents bring me the headboard my mom saved off the curb. Actually, that might have to be a whole series of posts since I'm getting a LOT of awesome stuff when they come visit me. :)

Saturday, February 25, 2012

Adjustments to Ana White's free Farmhouse Table plans

I've gotten a couple of requests for the plans I used to build my dining room table on my Brag Post over on Ana White's website. For the record, These plans are based are Ana White's original plans which you can find here. She deserves the all the credit for the original plans and for giving me the confidence to build this table. I am only posting on the changes I made to her original plans here to help clarify what I did that isn't in the original plans.


Dimensions

I made my table larger than hers (slightly wider even than the 96" Farmhouse Salvaged Wood Rectangular Extension Table it was based on).  The overall dimensions are 96"L x 43 1/2"W x 31"H. With the 15" extensions installed it's a whopping 126" (that's 10 feet 6 inches) long. It seats 8 comfortably, 12 with the extensions.

Materials & Tools

Shopping List:

Follow Ana's list for everything but the lumber. For lumber you will need:

8 – 8' 2x4s
7 – 8' 2x2s (get 8 if you're building both sizes of extensions)
8 - 8' 2×8s

Tools:
You need a 1/2" drill bit in addition to the tools listed in the original plan.

Cut List

The changes I made resulted in some changes to the cut list. This is the complete list of my cuts.

A) 4 - 2×4 @ 29 1/2″ (Outside Legs)
B) 4 – 2×4 @ 29 1/2″ (Inside Legs)
C) 2 -2×4 @ 36″ (Bottom End Supports for the Stretcher)
D) 1 – 2×4 @ 78″ (Stretcher)
E) 2 – 2×4 @ 73 1/2″ (Side Aprons)
F) 2 – 2×4 @ 29 1/2″ (End Aprons)
G) I didn't cut these pieces since I eliminated the overhang supports on the ends.
H) 2 – 2×2 @ 70 1/2″ (Overhang Supports, Sides)
I) 7 – 2×2 @ 29 1/2″ (Under Tabletop Supports)
J) 2×8 @ 43 1/2″ (Extension Boards) - I would recommend building the table and checking the width before cutting these. You'll need 2 to make 7 1/2" extensions and 4 to make a set of 15" extensions. 6 if you want both.
K) 6 – 2×8 @ 96″ (Tabletop Pieces)
L) 4 - 2×2 @ 20 1/2" (Extension Spacers)
M)  4 - 2×2 @ 28 1/2" for 7 1/2" extensions, @ 36" for 15" extensions. One end cut at 45 degrees (Extension Supports)


Steps 1-5

Follow the steps as shown in the original plan. The only differences are that the legs are an inch longer, I only cut the notches for the notches at the bottom 1 1/4" deep, and I put the notches on opposite sides of the legs so that the stretcher support would be on the outside. That makes the stretcher support stick out by 1/4". Both changes make it more similar to the RH version.

Your outside legs will look like this


and the inside legs will look like this.


Which means the legs will go in different positions than they would in her plan, but you put them together in the same way in Step 4.

I cut the notch in board C 1 1/4" deep in Step 5.


Step 6-7

I followed the NOTE in the original plan and switched the legs in Step 6 then followed the directions exactly as in the original plan just with boards cut to my dimensions.

Steps 8-9

Before I built the apron, I cut 1 1/2" wide notches in the end apron pieces 3" in from each side. Cut the notches a little wide so that a 2 x 2 can easily fit in the notch.


Step 10

Place the supports on the ends 10 1/2" from the sides. The rest I spaced at roughly 5 1/2" following Ana's directions.


Step 11

I only used side overhang supports (the long ones).

Steps 12-13

Skip them since this table has extensions instead of a permanent breadboard end.

Step 14

This is where I went freestyle. I didn't want to be able to see the screws in the top of the table so I screwed everything in from the bottom.  You can skip this step too.

Step 15

The table only has 6 boards on the top so the two center boards are lined up with the center of the table. Center them lengthwise as well and screw them up through the table supports ignore the fact that I failed to include the side supports in the diagram. They should be there.


Step 16

Fill in the table top with the other tabletop boards. The four center boards are attached to the table supports.


Step 17

The last two boards are only attached to the side apron and 2x2 side supports. Sounds dicey, huh? Not really, It's three whole inches out of the 7 1/4" width of the boards.

To attached them, drill 1/2" holes 1 1/2" up through the side aprons. This would be a lot easier if you flip the table over on its top. You'll need help though since its 8 feet long and probably weighs 150 pounds. TIP: If you put a piece of tape 1 1/2" from the tip of your drill bit you'll be able to see when you have the hole deep enough.

I did one about every 6". (They are basically really deep countersink holes that will allow you to get a drill bit in to attach the boards with 2 3/4" screws.) Also drill on about an inch in from either side of each of the board in the end apron (make sure you don't try to put one of them up through the notches). This is a lot of holes and I'm pretty sure its the step where I burnt out my cordless drill. I invested in a corded one.


Also predrill countersink holes in the overhang supports every 6" offset with the holes in the side apron.

Step 18

Attach the boards with 2 3/4" screws in all the holes you just predrilled. It's 48 screws in case you're curious. Those boards aren't going anywhere.

When you're done you'll have a table that looks like this and probably feel like taking a break from building for a day or two. You don't have to make them at all, but I like how they look and they increase the overhang on the ends so you can push a chair under the table which is nice.


Step 19

Predrill and attach the extension spacers to the underside of the end overhangs. Make sure they line up with the inside edges of the notches.


Step 20 

Predrill and attach an extension spacer to the center of each of the extension end boards along the edge of the board.

Step 21

Predrill and attach the extension supports to the extension boards. TIP: Make sure they are square with the board and line up with the holes you cut in the apron ends of the table. I actually put the support pieces through the notches and attached the extension board in place to make sure it would fit.


Step 21

To make the 15" extensions repeat Steps 19 and 20 using the 36" extension supports. Then add the other extension boards inside of the first.


Step 22

Slide the extension into place (they aren't actually attached to the table at all, but they won't move, I promise. Admire your ridiculously awesome and enormous table.


I hope that makes sense. Let me know if you still have questions. :)

Friday, February 24, 2012

Hutch for my 28th Birthday Writing Desk

My mom (and I think maybe my dad too) gave me this vanity for my 28th birthday.


They gave it to me because she knew my Illustrated Discovery Journal is the best place to find birthday present ideas for me. (Apparently, when you don't really get too excited over new items it makes you hard to shop for.)

This desk was one of the very first items I added to my IDJ.


I'm going to make a hutch for the vanity to convert it into my very own fabulous desk inspired by this own.

Now, depending on how well you know me or how much attention you are paying you may or may not have noticed just how long this project went undone. (I'm 29 and I got this desk before we moved into The Parsonage.)

I'm going to finish it though. And soon.

Why? Because I desperately want to add a Project Plan to Ana White's website and because I just really want my freaking desk. How could anyone not want that desk? It makes me smile every time I see it.

Since it was a vanity the center of the top was hinged to open up with a mirror. I've already cut out the front center and built the drawer box. (I still need to reattached the face. I made a tiny cutting error and I need to fix some collateral damage before it's ready to attach.) Other wise I just need to build the hutch, change out the knobs, and do the sanding/painting part.

Now that I have a reason, I think I can get in short order. I designed a couple different versions of the hutch in SketchUp over a year ago thanks to Ana's helpful tutorial. I made the center a little higher so my laptop can be pushed back into it while it's open. I need that. I should probably also add the decorative bit of detail to the top of the hutch before I post it, but you get the basic idea.


I'm not entirely sure which of the two I want to do, but since the only difference is a shelf I think I'll make it peg style adjustable and then I can just take it out altogether if I decide I don't like it.

So that's the plan. Buy wood, cut, and build the hutch and create the Project Plan so other people can do it without having to think quite so hard about how to make the whole thing go together. Should be easy, right?


Update: I swear I didn't remember posting about this exact same project last April. Check it out. Let's hope I actually do it.

Wednesday, December 8, 2010

Holy frick.

Ana White commented on my table. I mean, I posted it to her facebook page so I dramatically increased the chances of that happening and she has to say nice things so people will keep reading her blog, but she said nice things about my table and I'm pretty sure they were genuine. That is all.

Monday, September 20, 2010

Ana White Rocks My Face Off.

UPDATE: Ana wrote a book, The Handbuilt Home. If by some miracle you found my blog without linking from her site you should know that it exists.


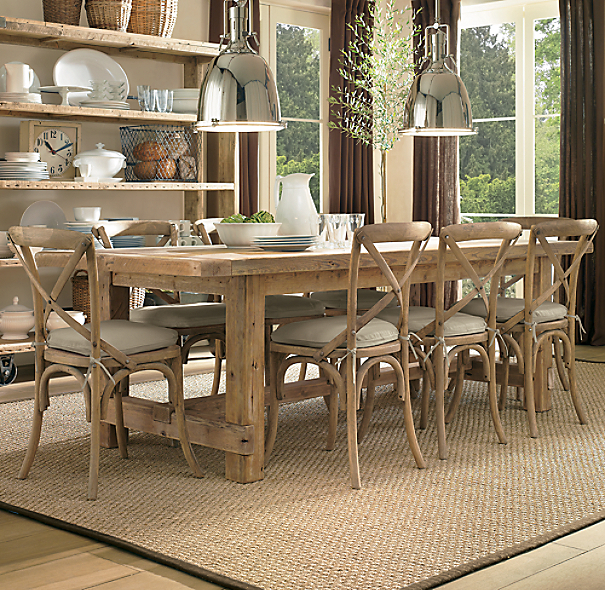
I've been obsessing about this woman's blog for a while, If we're tight you might have even gotten an email linking to her blog. I found it when I was searching for plans for the Farmhouse Salvaged Wood Rectangular Extension Dining Table I love from Restoration Hardware.

Source: Restoration Hardware
I know. It's gorgeous, but no freaking way am I ever going to spend almost three grand on a table.

Not happening.

So I searched for plans (I mean it does look like something someone could reasonably build) and I found this post. Go ahead. Click it. I won't even be offended if you get totally distracted by her blog and don't come back for a while. God knows I did.

Right, so I have at least five or six projects I fully intend to build just as soon as we have a house and I won't be creating more stuff I have to move. It does seem a little silly to build furniture when the vast majority of everything you own is in storage.

I've been planning on posting about her blog when I built my first project, but today, she busted out plans for the Markham Console Bar by Pottery Barn that I actually cut out for my Illustrated Discovery Journal.

Source: Pottery Barn

(Side note - If you don't have an illustrated discovery journal you NEED one. It's a book full of things that make your heart smile. I have a real physical book with pictures cut and pasted in AND a digital one that I collect images in on my computer. I think sharing it might be a bit of a copyright issue though so you'll have to be content with a smaller intro to my authentic self).

You might have noticed that the workbench bar isn't in any of the images in the Picasa album. That's because I haven't glued it in yet. It's still in the pile of cut images awaiting placement.

The point being that this woman knows my soul and her blog is amazing. Did I mention she posted plans, real actual plans, ones could use to build the workbench bar? Like so that I could make one myself instead of buying one? If you don't get how amazing that is you clearly don't love furniture the way I do. If you do, go ahead and subscribe to her blog so she can rock your face off too.
I'll let you know just as soon as I build something. Until then, know that I am planning amazingness.

LinkWithin

Related Posts Plugin for WordPress, Blogger...