Wednesday, March 28, 2012

Changing Table Reveal: Hibbs House Project Week 2012

I've been having a little trouble posting a reveal of the changing table my mom created for me the baby. It's been done for almost two weeks (like ever since that Hibbs House Project Week (HHPW) I promised to post about), but it's so fabulous I haven't wanted to post until I could take pictures that would do it justice. I've been busy during times when the light was right and I never quite got around to being ready until it was dark and the lighting was atrocious. As a result, I keep pushing it off.

Until today. I'm posting about this bad boy today if it kills me. I'm writing this post before I even take the pictures so I know I just have to take them and stick them in and it will be done.


It's been a long time so here's a refresher on the whole changing table situation. 


My mom brought this dresser with her when she came for HHPW.


It has all the drawers, but I forgot to take a before shot until after we had already started painting and I wanted the before to be pure before. My dad had already put some serious effort into improving the functionality by making the drawers actually work and slide in and out easily. He's a genius when it comes to stuff like that.

She painted the whole thing out in Old White Anne Sloan Chalk Paint. And I got this crazy hair to paint the inside of the drawers with some hot pink paint I had leftover from the Dream Dollhouse project. 
I think its part of the ongoing battle between my love of pink and my hate of girl's nurseries that are swimming in it. I like pink a lot more than I ever thought I would, but seriously people, your child having two X chromosomes does not necessitate her living in a room that looks like Strawberry Shortcake threw up all over it.

After I got done I was a little concerned that it might be too pink, but since its only the inside of the drawers I figured I could give it a bit and see how I felt about it later.


Once the inside of the drawers had so much attitude it became clear to us both that the outside needed to have a little something more than off white going on. We talked over several ideas and settled on a chevron pattern in Provence. Pink was discussed, but we determined that would be just a little too much.
Could that be the result of Anne Marie's recent (it was recent when we were making this decision) guest post on Perfectly Imperfect? I think yes.

I did a little google image searching of my own and came up with this fab dresser on ampirlot's flickr.


LOVE.

The dresser had the same basic shape and I liked the proportions of the stripes so I used it as a pattern for the chevrons on the changing table. I taped off the stripes and my mom painted them. She was a little concerned about my taping technique at first. Apparently my plan wasn't immediately obvious when she looked at the dresser and she thought I just wasn't super careful in my taping. Once I clarified that the neat lines where around the spots to be painted and the random torn tape ends where in the part that was going to stay white she was on board. I didn't remember to take picture until after she'd gone over the tape edges with a layer of white (which is a great thing to do if you want super sharp tape lines).


It took every bit of self control I had to leave the tape on long enough for her to finish two coats of paint on the stripes. I wanted to see it so bad it literally hurt. Seriously, I'm pretty sure I bit my lip a little.


Isn't it just the cutest little thing you've ever seen? And check out the hot pink inside the drawers.

The next day I went to Hobby Lobby and picked up a couple of potential knob options you might remember.


We both thought the polka dot would win out, but when I put them on the whites didn't quite work and the knobs seemed a little small given the scale of the chevrons. We settled on the clear glass ones.

I came up with a great of idea for a couple of the polka dot ones though.

Here's the finished product.


Tuesday, March 27, 2012

It's someone's birthday

Hint: she's my oldest and she used to look like this.


Yes. I have been told I have an absurdly adorable dog. And accused of picking her for her looks. We did pick her out of the litter from a picture so I guess that's true on some level. How could anyone not take this dog home? Seriously?


Even a little lankier she was cute. Look at that face. LOVE.


These days she's more beautiful than adorable, but she's still pretty darn cute if you ask me. People keep telling me she'll become more of a dog and less of a child once I have my human puppy, but I think the level of misplaced maternal attachment I have to her is way greater than they think.

Happy birthday Miss Kleio! :)

Monday, March 26, 2012

DIY Home Recycling Center

Hey Kiddos.  Guess what?

I actually completed the project I said I was going to complete in Friday's post.

It's okay if you're shocked. I'm a little shocked myself.

And the best part? I made it entirely out of stuff I already had on hand. Most people probably don't have a 4'x8' sheet of plywood on their porch so if you wanted to make one too you'd have to buy some materials.

I didn't actually have a 4'x8' sheet of 3/4" plywood either. I had a 4'x8' sheet of 1/2" and a 4'x8' sheet of 1/4" plywood that I laminated together to make a 3/4" plywood. You should just buy a piece that's already the correct thickness, but I somehow ended up with these and I can't remember what my original plan for them was so I made what I needed.

I started on Friday after work by ripping both sheets down into 15 1/2" widths so I could pick them up by myself (if you're new here I'm seven months pregnant and I've finally realized that I can't do all the things I used to be able to do easily AND make a baby. I work slower, I take more breaks, and I ask for help a lot more than I'm used to). Then I glued them together into 1x16s, a brilliant invention of the lovely and talented Ana White, with regular wood glue making sure I glued the rough sides together. I stacked all three in a pile and added some other wood I had lying on the porch on top to help make sure they dried flat.

Then Saturday morning after we put together the crib (photos coming soon), I cut my 1x16s and built my recycling center according to Ana's Laundry Basket Dresser plan. I didn't have any metal angle and had some leftover particle board from the closet organizer I built over a year ago, so I ripped it to 1 1/2" widths and fashioned 2x2s by layering two of them. The particle board was already 15" or so wide so I just ripped in the direction that meant I didn't have to cut them. I finished off the afternoon by applying wood filler.

Sunday morning I sanded them down and gave them two coats or Glidden's Parchment White (leftover from the board and batten in the bedroom).


I let them dry while I helped Austin with yard work. Later, I moved them into the laundry room and slid in the baskets I bought back in December or so when I originally planned this project. I even sorted our recyclables into them.


It almost gives you the impression we're organized, huh? We'll go ahead and call this the original "Before" for the laundry room. I can't handle you knowing what this corner looked like prior to this weekend.

Friday, March 23, 2012

Laundry/Mud Room Makeover

You know how I told you my mom was here all last week and worked on projects all over the house and I would post about them?

This post is not about them.

It's about something I've wanted to do since the day we moved into our house, but haven't. It's about our laundry/mud room/only way to access the only bathroom on the main floor. It's so bad it's embarrassing. Really, I tell people they have to swear to love me anyway or just close their eyes before I tell them how to get to the bathroom. If you're seen my front porch you have some idea of how bad a room has to be before I get embarrassed by it.

The other part of this problem is that we are throwing two parties in the next couple of months that will require people to use the bathroom you can only get to through this room. Clearly, something must be done and must be done soon.

The problems in the two spaces are  actually linked. I bought the wood for a project that will handle quite a bit of the disorganization in the laundry room months ago and it's been on the front porch ever since. Operation Use and Remove commenced on the porch wood pile last weekend (posts to follow, I swear).

This weekend I'm taking on that big (physically big, but not actually hard) project and helping out both spaces.

What is this mystery project?


Ana White's Laundry Basket Dresser. I'm not actually planning to use it for laundry though. I'm going to use it to keep our recycling sorted. That's the plan for now anyway. I suppose I can always change my mind and use it for laundry.

I also REALLY want to coat the particle board walls and bare sheet rock ceiling with a couple layers of drywall compound and paint it a cheerful yellow. And some day I'd like to buy an inexpensive butcher block counter top from Ikea and make a wood base for the sink and install some new hardware to give it more of a farmhouse look, but I'll settle for tidy and unattractive at this point.

Austin said he'll assist in cutting down the 4x8 sheets of plywood tonight so I can put it together tomorrow. I'll try to remember to take before and after shots of both spaces. Not sure I'll be able to work up the courage to post before of either though.

Thursday, March 22, 2012

Parasites, Worms, and the Human Body in Religion and Culture


Remember back when I used to talk about academic stuff?

Way back when the blog actually was Academic. Domestic. Awesome. not just domestically awesome? I'm having a hard time remembering that far back too.

I got a friendly reminder yesterday in the form of an email from my friend Jo. She had gotten her copy of a lovely little publication from Peter Lang entitled Parasites, Worms and the Human Body in Religion and Culture

Sounds fascinating, huh?

No seriously. That is the sort of thing that sounds fascinating to me. If we're ever in a bookstore and you can't figure out where I've run off to, look for books like this. Human parasites and diseases and people's ideas about parasites and diseases are really cool.

Which reminds me. I have a couple of books to add to my book club list (like New Guinea Tapeworms and Jewish Grandmothers and Who Gave Pinta to the Santa Maria?  And a reading list page to add to my blog....

That's not the point of this post though. The point is that I can finally update a line in my CV (curriculum vitae, an overview of a person's experience and other qualifications very similar to a resume, but for academics. I think we just feel special because we call them something in Latin).

Did you catch the link there?

No?

I can update it because the chapter I originally co-authored for a conference held in 2009 is finally published. It's been listed as (in press) for years. It's really quite exciting. Or at least nice to have it seem finished up. 

In case you're curious, but not so curious you're willing to spend $77 on a book about parasites and worms in religion and culture, our chapter is about belief in Nagas, a sort of deity linked to water, and how those beliefs influence personal hygiene practices of believers. In short, people who believe in them are less likely to contaminate surface water with fecal matter and that should, at least theoretically, reduce transmission of several parasitic infections.

Super cool, huh?

Monday, March 19, 2012

I miss you.

I know I haven't posted about any of the projects from last week. Don't worry. A TON of stuff got done. I was just so busy doing it that I didn't have time to take pictures or post. I promise I will soon though.

Until then I miss you!

And he soon-to-be playroom has new carpet! Woot! I'll post about that too I swear.

Thursday, March 15, 2012

I won! I won!

I won the insect identification contest at my local garden show. Woot!

Tuesday, March 13, 2012

Another hint.

Does this even count as a post?

I'm so exhausted I think it just might have to.

I'll tell you all about some projects tomorrow. Promise.

Monday, March 12, 2012

DIY Compost Bins from Scrap Fence Pickets & Cedar Balusters: Hibbs House Project Week 2012

My parent's volunteered their time to come help out with some project's around our house this week. I've got a ridiculously long list of projects lined up for them so get ready for some awesome projects all week long.

Spreading out the seed I bought for the lawn last fall (when you really should seed a cool season lawn) was on the list, but we really needed to rake up the leaves on the lawn and mow the grass a little shorter before we put down the seeds.

I'd been meaning to make a New Zealand compost bin to collect all those leaves in. I even bought the cedar balusters I needed to turn the pile of cedar fence pickets leftover from our fence project last spring into those bins a couple of weeks ago. I hadn't quite gotten around to actually building them though. (I also built several raised beds from some of the other leftover pickets we had. You can read about those here.)

On Saturday morning, my dad and I got to work. We used a plan from my copy of The Vegetable Gardener's Book of Building Projects.


For $15 in cedar balusters we made a 4'x4'x2 1/2' bin for compost.


That's 40 cubic feet of compost space. That's all the leaves off of a quarter of our entire yard in there with the contents of our old dilapidated compost bin. There's still a good foot of space in there.


I still had a ton of pickets and my dad had the ingenious idea to make couple more bins sharing the sides. We almost finished 3 of them, but we ran 4 balusters short. I bought the balusters Sunday night, but I didn't get them finished before I took pictures this evening. 


I have a LOT of raking to do.

Here's a little hint about another project I'll post about just as soon as it's done. It's AMAZING.

Friday, March 9, 2012

James Hansen TED Talk and a Climate Change Infographic

I didn't post yesterday and I don't really have time today. I'm devoting all the energy I have to working on the grant proposal that will hopefully fund my paycheck for the next 5 years. It's important, interesting work creating climate change education for agricultural producers and communities in the Great Plains.

Here's a video one of the Senior Personnel on the project shared with me. It's a TED Talk by James Hansen.


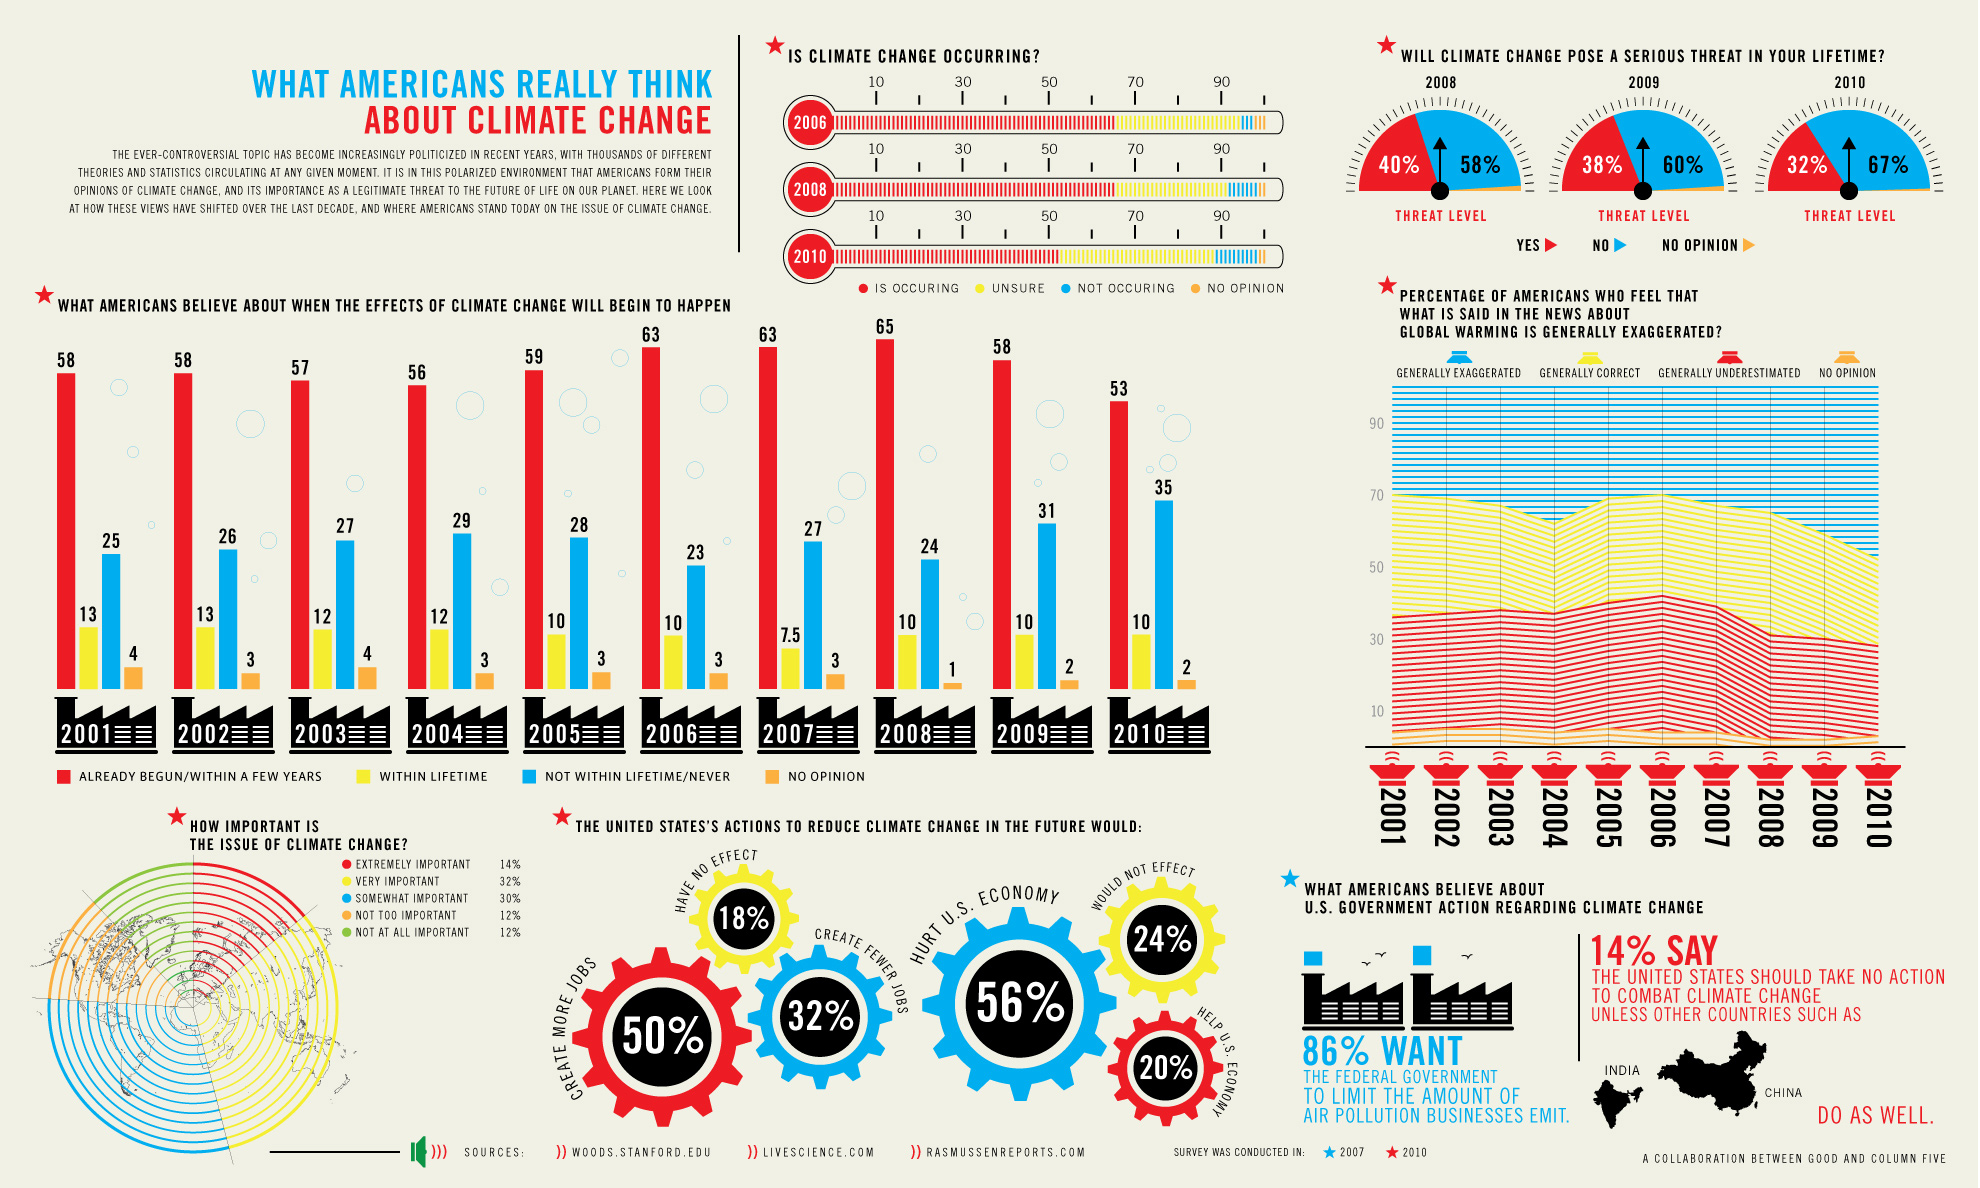
And here's an infographic about What Americans Really Think About Climate Change from GOOD.


Have I ever mentioned how much I love infographics? I think I might start Infographic Friday around here. What do you think?

Wednesday, March 7, 2012

Nursery Wall Art

We've lived in our house for over and year and it still doesn't look like us. It has all our furniture, but really, anyone could live there. I think that has a lot to do with the bare walls. Seriously, we have like maybe 8 things hanging up in the whole house. The only exception is the collection of framed photos in the stairway.

An inventory of our wall art would go about like this:

Front room without a clearly defined purpose - 1 huge painting of the Plaza San Marco I bought at a junk shop with my mom before I went to grad school
Media room - nothing
Dining room - 5 plates
Kitchen - some stuff on top of the cabinets, put nothing with a clear vision or purpose and nothing on the walls
Master bedroom - blank walls although there is one piece we got for our wedding leaning against the wall
Guest bedroom with the exercise equipment - Sea painting actually hung up and another leaning against the wall
Other guest bedroom/my office/craft room - 6 whole pieces on the wall. I hung them once and I think I meant to post about them. I also have a collection on the floor waiting for me to finish the hutch for the desk so I have a better idea about the overall layout of the wall.

That brings us to the nursery. I haven't shown them to you yet, but Austin encouraged me to sketch up what I was thinking about in there so I could have a better idea of the projects involved. My sketches had no less than 11 pieces of wall art.

Kind of a lot for a woman who hasn't gotten around to making or hanging much in the rest of the house, huh?  Since I'd like to get the nursery finished before she heads off to college I think I'll just try to push through and get it done before she's born. Otherwise I think it may end up languishing with the rest of the unfinished projects in the house.

My Pinterest Nursery Board has several pieces that are also on our registry. Like this one from Wallfry.


I have spots picked out for them just in case someone decides to gift them to us.

This one I got from The Wheatfield by Katie Daisy, had matted in fushia, and framed.


It also has a bunch of ideas for pieces I would like to create and hang. I started one last night and was going to post about it tomorrow, but Target's website lied to me and the shadow box frame I need wasn't actually in stock in white. I hate it when that happens. I'll save the details for the post.

I'm going to go ahead and tell you all about the details of another project though. I can't help myself. It draws from three pieces of inspiration.

First, this lovely letter decorated in a Katie Daisy print. I know, you're shocked. 


The full name in landscape idea that was inspired by this image from Chic Channel Inspired Baby Shower from On to Baby


And the bright colors of all these frames from Megan's Home Made Lovely tour inspired me to go with something other than brown or white.


I have the perfect frame just waiting to be filled. I saved it from my mother's dumpster pile one day. It's currently gold, but I think I'll paint it aqua and distress it like this one I found on Etsy (sorry, it's already sold, but Swede13 Inspirations has lots of other lovely items you might want to check out).


There you have it. I'm sure you can envision it perfectly, but I'll go ahead and post once I have it done. Maybe next week. :)

Tuesday, March 6, 2012

Plan Adjustments for 72" Rustic Farmhouse Dining Table based on Ana White's free plans

I got a lovely email from a woman named Jill last night who wants to build a smaller version of my dining room table. If you're not familiar with the story behind this table you can find the original post about it here and the explanation of all the changes I made to the original plan here.


Jill loves this table but needs a smaller one.

I guess not everyone has a 17 foot long dining room they need to fill, huh?

The bigger issue with shortening the table for me is making sure the new dimensions result in a table that is comfortable to sit at. I did some research back when I was planning my original table and found that apparently people need 24" wide and 18" deep to eat. Restoration Hardware must agree because their smaller version of the table seats one less person on either side and is 24" shorter.

I've actually been thinking about cutting mine down someday and turning it the other direction if I can figure out how to expand the kitchen. Not sure I'll ever figure out a way to do that and maintain the historic integrity of the house for Austin. 

If you'd like to shorten the table to 72" (102" with 15" extensions) which will seat 6 (8 with the extensions) just a couple of changes are needed to the Cut List. All the instructions stay the same. The complete list of cuts for the 72" table are:


Dimensions

The overall dimensions are 72"L x 43 1/2"W x 31"H, 102"L with a 15" extension installed on each end. It seats 6 comfortably, 8 with the extensions.


Cut List

A) 4 - 2×4 @ 29 1/2″ (Outside Legs)
B) 4 – 2×4 @ 29 1/2″ (Inside Legs)
C) 2 -2×4 @ 36″ (Bottom End Supports for the Stretcher)
D) 1 – 2×4 @ 54″ (Stretcher)
E) 2 – 2×4 @ 49 1/2″ (Side Aprons)
F) 2 – 2×4 @ 29 1/2″ (End Aprons)
G) Omitted in this version
H) 2 – 2×2 @ 46 1/2″ (Overhang Supports, Sides)
I) 7 – 2×2 @ 29 1/2″ (Under Tabletop Supports)
J) 2×8 @ 43 1/2″ (Extension Boards) - I would recommend building the table and checking the width before cutting these. The 43 1/2" assumes your boards are exactly 7 1/4" wide (the perfect dimensions of a 2x8). You'll need 2 to make 7 1/2" extensions and 4 to make a set of 15" extensions. 6 if you want both.
K) 6 – 2×8 @ 72″ (Tabletop Pieces)
L) 4 - 2×2 @ 20 1/2" (Extension Spacers)
M)  4 - 2×2 @ 28 1/2" for 7 1/2" extensions, @ 36" for 15" extensions. One end cut at 45 degrees (Extension Supports)

NOTE: The only changes to the cut list are on pieces D,E, H,and K.Everything about this table and how you would go about building it is the same, except the length of the pieces you cut.

Monday, March 5, 2012

Gratitude.


Austin sent me this picture of Kleio when I was in San Francisco at the AGU meetings last December. It pretty much sums up how I've been feeling this morning. She looks pretty pathetic and sorry for herself, doesn't she?

I seriously thought about a cop out post about my poor emotional state, but I've had a mental shift. Instead I'm going to post about 5 things I'm grateful for. I used to have a whole gratitude journal I wrote five things in every single day.I still have the journal, but I've been remiss about writing in it lately. Maybe that has something to do with my lack of gratitude induced joy. Hmmm.

In no particular order:

1. Katie Sawicki and the wonders of Pandora knowing just when I need to hear her.
2 Puppies who care so much they become pathetic and sorry for themselves in my absence.
3. Knowing I get to go home to my super cute and sweet and funny husband at the end of the day.
5. Having the best sister and brother-in-law in the whole world. Happy anniversary!

I feel much better now. Sometimes I just need to shift my perspective a little and thinking about all the awesomeness in my life really helps even when pregnancy has me hormonal and crazy.

Friday, March 2, 2012

Maternity Wardrobe Ideas

I work on a college campus. My job isn't that fancy and I wear jeans most days. From a distance or if you aren't really paying attention I could look like a college student who tries just hard enough to wear a cardigan and a necklace to class.

That's not really an issue until you become pregnant enough for the casual observer to notice. (Which apparently is today. I've had four people I don't know ask me when I'm due since I got to work).

Now, I'm basically the embodiment of every student's worst fears. You can see the terror in their eyes when I walk past.

It's even worse with the groups of high school seniors and their parents here for campus visits, especially the ones with girls.

In good news, I have a design idea for a maternity t-shirt.

Not that I think you need all those things. I just think it might make dads with 17 year old daughters feel a little better.

Thursday, March 1, 2012

Nightstands

Austin and I need nightstands for the master bedroom. We currently have a single nightstand which is on Austin's side since he is in charge of the alarm clock. That means my glasses an anything I read before bed live on the floor next to the bed. It also means that I can't have a lamp on my side. Both are problematic.

I've had this nightstand pinned to my Things I want to Make board for a while.

Source: ana-white.com via Amber on Pinterest


It's very similar in shape to our current solo one which I love and have considered replicating to have a matching set. I'm also open to nightstands that don't match as long as they "work."

Yesterday I saw this nightstand Shaunna West pinned and had a flash of inspiration.


I love the color on the before.

I thought that was the answer. Find or make nightstands and paint them awesome distressed green.

Now I'm having some doubts about that.

I'm sure about the shape though. The one we have, the plan I pinned to build, and two others are the same basic structure. 

I would really like to add yellow trim to our sheets to make them more the ones from my Illustrated Discovery Journal.


And I'm thinking I want to make a couple of beer bottle lamps like I have at my Etsy shop, from Life & Limb bottles to solve my lamp issue. I mocked one up so you can get an idea.


And then there is The Bed. Here's a sneak peak at the foot board before my mom added the fancy trim and stained it.


Based on all that I'm thinking maybe green might be too much. What about mustard?

Pretty sure Austin will hate that idea so maybe I just need to make another to match our current one and stick with the distressed black it already is. Hmm.

LinkWithin

Related Posts Plugin for WordPress, Blogger...