Showing posts with label paint. Show all posts

Monday, February 11, 2013

New Chalk Paint Recipe and a Desk Reveal

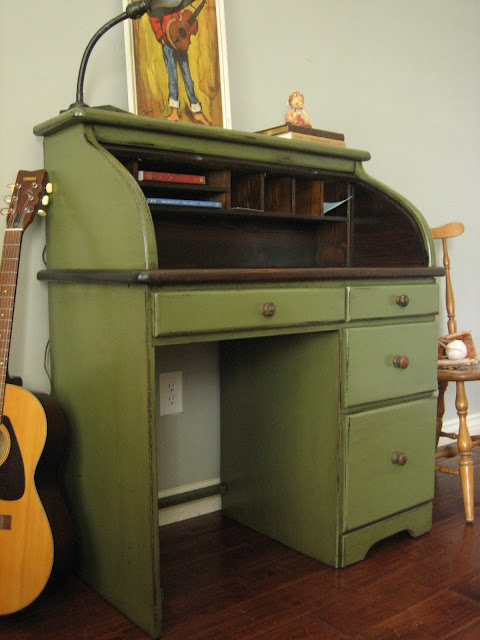
Several weeks ago I posted about the desk I worked on with my mom on Martin Luther King Jr. Day. By "worked on with" I mean painted while she busted her butt to sand and refinish the entire top. I didn't get it oiled and moved off the porch and back into the house until a week or so later. Ever since I've been meaning to move our desk stuff back into it and stage it for some glamor shots.

That's not going to happen in the near future and I'm working on being honest with myself about what I can actually accomplish and not starting new projects I won't finish.

I've come to terms with it. I hope you have too and you appreciate the poorly lit shots I took.

Before I show them to you I want to share my mom's new homemade chalk paint recipe. It is a MASSIVE improvement over the old one.

DIY CHALK PAINT RECIPE:

1 part HOT water
1 part plaster of Paris
3 parts paint

Mix the water and plaster and shake the bejesus out of it, shake it like a Polaroid picture, shake it like I don't know what, but shake it really, really well. Then just add the paint and shake it a bit more. It was the most amazing painting experience I have ever had in my whole life.

I mean that.

My WHOLE life.

Anyways, so those iffy, dark pictures of the amazing desk I promised you.


Someday you'll see some improved shots. Maybe when I add the room to the house tour.

Tuesday, September 18, 2012

DIY Chalkboard Upcycled Mirror

Hey kids! It's (How)Tuesday. I haven't done a how-to post in a while but felt inspired to bust one out today even though on this project what I really learned was what not to do. Don't worry. Doing it right it's not super elaborate or time consuming, but I think it made a big improvement. I had everything on hand so it was free to do which was an extra bonus, especially since I think I'll need to do it right one more time if I want it to be perfect.

I started with this fabulous mirror a mirror with a similar vibe to this one that my mom pulled out of someone's dumpster or off their curb or something. I forgot to include the picture and it's on my laptop which is in intensive care at the moment.
Interesting note: I had to image search "etched mirror goose" to find that image. If you image search "duck mirror" you get a TON of pictures of this


Anyway, she left the mirror on my porch and I poached it. I figure if I make use of it becomes mine. Adverse possession and whatnot. 

I gave it a quick coat of chalkboard paint (no primer, no nothing) and sent this text.


I gave it a couple more coats and left it on the porch for a month or so before I got back to it. Hence the date of that text relative to now. I have a baby, okay?

When I did I noticed that it had some serious brushstrokes.


See those little lines? They looked worse in person and something told me they might be a little problematic for writing. I did some internet research and found this helpful tutorial.

Turns out you should, at least theoretically, use primer and a foam brush and apply the coats are right angles to each other. Not exactly earth shattering, but potentially important. I sanded the surface in a circular motion with a sanding block to smooth out the lines until it felt smooth and gave it another coat with a foam brush and perpendicular to the previous ones. in case you're curious I didn't have any issues with the paint standing up to sanding even without primer so I'd just skip it out of laziness. It probably really still needs another coat of paint to be totally smooth, but I decided to hang it up instead. Perfect is the enemy of done and done is pretty important to me at the moment.

Here it is above my mantel.


Stay tuned for my fall mantel reveal next week. I'm going to join a link party on Centsational Girl on the 25th.

Wednesday, April 4, 2012

My Life's Calling

Last night I went over to my aunt and uncle's house to check out a couple of items my aunt thought I might want before she hauled them off on free dump day. One of them was a roll top desk. Ever since I haven't been able to stop thinking about it.

Before you get all disgruntled about my obsession with painting wood it's not a roll top desk.


It's a roll top desk.


It's in dire need of a makeover. You can see how this one turned out at The Olde Farmhouse on Windmill Hill.
 
I did a little google image searching and found this one from European Paint Finishes which I LOVE. (I'm sure you can guess why.)


I have a fabulous plan and if I had time to get it done I would try to sneak it into a friend's Tulip Festival booth for sale in a couple of weeks.

That's right. I'm obsessing about a piece of furniture I don't even intend to keep. I just want to paint and sell it. That's where we get to the life's calling part of this whole story.

I was born to make ugly things pretty. Mostly wood things and mostly by painting them.

It took me a while to figure this out, but its totally true and I'm just going to go with it and try to work it to the fullest by actually finishing projects so that I can move on and spread more joy and attractive furniture. Not to worry babe. I'm finishing up my current projects first. I promise.

On another note. Apparently Pier 1 Imports in following me on Pinterest. I'm sure this is social marketing/research, but I'm going to tell myself it's because I have such fabulous taste they want to know what I think since I always want things 6 months before they come out in stores.

Wednesday, January 25, 2012

Just One Thing: A Hook for My Robe

I worked on a ton of projects this weekend.

Right after breakfast I did some laundry and took the recyclables to the recycling center (without a total breakdown). Then I started caulking these cracks in the board and batten I put up in the master bedroom.


I helped Austin with the first coat of paint in the nursery. I suffered a tiny bit of collateral damage ( please excuse the fact that I obviously haven't painted my toe nails since before I got pregnant),


and we ran out of paint, but he found a creative outlet.


I also took the table saw I got for Christmas out of the box, and even started working on super awesome budget friendly glass curtain rods finials for the guest bedroom (Don't worry, I'll post a how-to on those one just as soon as I get them finished).

Are you noticing a pattern here?

I started or worked on a lot of things, but I didn't finish any of them.  I was getting seriously frustrated.

Then I had a moment of inspiration; I needed to follow Austin's easy project policy (i.e. do the thing that takes little effort and will actually increase your quality of life). So I picked a little project I've been thinking about for a while. I put a hook on the back of our bedroom door for my robe.

It's winter and we don't exactly keep the house at an optimal temperature for getting up in middle of the night in your skivvies to go to the bathroom (a frequent occurrence when you're pregnant) or let the dogs out (a common result of waking up the dogs when you get up to go to the bathroom). I have a robe, but the only place to hang it up is in the bathroom which means my options are to walk to the bathroom without it or keep the robe on the floor next to the bed.

I'll let you guess where it's been for most of the last two months.

But it's not anymore.


Not exactly the most exciting or impressive home improvement project I've ever undertaken, but I'm pretty happy about finishing it.

Monday, April 4, 2011

It's not finished...

and I've been holding out on posting about it for weeks.

I've been showing anyone who will stand still long enough for me to crack out my phone the pictures though.

Literally. Anyone.

The woman who owns a flea market I frequent has seen them.

You should feel slighted.

So here goes.

For reference, the kitchen looked like this when we moved in.

It felt dark and dirty, and even though tulips were my absolute favorite flower at one point, I was NOT feeling that wallpaper border. 

I tried to hold out for as long as a could. I knew it was a bit of a project and I'm working on not starting too many of those. 

One day I just could take it anymore and starting prying off the trim and peeling the border down.

I don't think Austin was pleased.

I was. Even with half peeled paper it looked better than before.

In the process I found out why they put up that border in the first place. That wall board stuff with the pattern on it that covers the bottom 8 feet of wall is only 8 feet long. 

We have 9 foot ceilings.

They didn't want a horizontal seam around the top of the room and opted for a layer of plywood finished in wallpaper and a piece of trim over the seam. Not such a bad idea really. 

Unless, of course, you hate that border and the pattern on the wall board and want to tear your eyes out every time you look at it.

Then it's a bit of an issue. 

It means you have to correct the difference between the surface levels of the two spaces and attempt to blend them together in addition to dremeling out the plastic seam cover things and spackling the entire surface of the kitchen to eliminate the wallboard's linen fabric texture. It only took two entire weekends to get it ready to prime and paint. The next week I primed and put a coat of paint over everything, including the cupboards.


Since then I've given the cupboards another coat of paint, gotten new drawer pulls and handles, and spray painted all the hinges with oil rubbed bronze paint to match. I'd take you a picture, but I'd have to wash the dishes from dinner first and the hubs is already in bed. I tend to bang things around and make a lot of noise. It will just have to wait.

You can think of this post as a teaser.

LinkWithin

Related Posts Plugin for WordPress, Blogger...