Showing posts with label decorating. Show all posts

Wednesday, September 4, 2013

Look At Me. I COMPROMISED!

I did. For reals. Well, in theory, technically, but I did and I feel pretty darn good about myself.

I know this might be a thing that other married people do all the time, but I don't, or haven't very well in the past. I'm actually kind of a closet decorating sociopath.

No really. I know you think I'm this sweet wonderful person who is bubbly and perky and cheery. Turns out if you actually have to share a house with me that all goes out the figurative window. I have a habit of only asking my husband's opinion when I think I'll like it and then ignoring it if I don't OR I just don't ask because I know we won't agree and I do what I want. Then I just act like I had no idea he would hate it.

What?!? You don't think we should paint the new dining chairs I found at a garage sale and bought without consulting you yellow?!? You're not a fan of aqua chevron?!? Did you not see this pin?


Because we both know those chairs are AMAZING!!! No, you don't want happy rainbow colored chairs?!? Why not?

For reals (is this my phrase of the day or something?). 

I even have myself convince sometimes that I'm not being conniving.But I'm turning over a new leaf. I'm actually going to act like my husband is a person who I love and whose opinions matter. I know, this should be a given, but it hasn't been in the past and I need to rectify it. Thank you for putting up with my crazy for so long, Babe. Lesser men would have bailed out by now. :)

We had a big talk about this a couple of weeks ago. I'm pretty sure he thought it was probably all talk just like it has been every time before when I said I was going to take his opinions into consideration before doing things to the house without asking. Something must have made him think I actually meant it this time because yesterday he sent a link to this AirStone Veneer stuff.
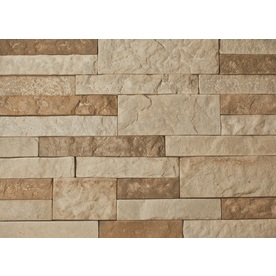
It was pretty, but since we hadn't talked about putting stone veneer on anything lately I wasn't really sure why. When I asked where he wanted to put it he told me in the kitchen.

My previous mental response would have been, "Say what?!? Once again, I don't think you've been following my Kitchen board on Pinterest very well recently because we are clearly planning on white subway tile."

Instead, I started searching for images where people had actually used it in kitchens. And guess what? People actually have and it actually looks good. 

I sent him this one because the comment really cracked me up.


True story. I want something a little lighter than this and I'm still partial to the subway tile natural stone versions like this one


but, I'm considering it a major victory in the fight to work together on decorating.

Friday, April 5, 2013

In Spring: Wall Art from Stickers and Thrift Store Art

A while back I was about ready to lose it if I didn't get to do just a little something creative so I took on a tiny project with a piece of thrift store art I bought a couple of years ago. Like thrift store art plus stickers tiny.


I had some sparkly pink stickers that came with one of the page kits I bought for my pregnancy scrap book, but hadn't used yet. The only problem was I had to decide what to write. Indecision kicked in and it took me a whole day to pick something.


Once I knew what I was writing I was feeling impatient and couldn't be bothered to take multiple shots or stand still long enough for a clear shot. Quick little projects like this get me way too excited. I didn't take any mid project either. Bad blogger. But seriously, do you really need pictures of how to peel off stickers and stick them on something?


Monday, March 11, 2013

How to Make DIY Blackout Curtains

Remember back in February when I posted about my snow day project?

It's still not done.

Not the curtains. I finished those up in four-ish days working during naps and after Norie was in bed.

That sounds really quick now, but at the time it felt like forever. I ran out of thread and bent two needles including one as I back-stitched the very last seam of the very last curtain.


Grrr.

I even hung them, as long as you count thumb tacking them to the wall hanging them.

I had to. Norie will not sleep in a well lit space and snow plus lots of windows equals a super well lit space.

The part I can't get done is the curtain rods. I'm way too cheap to buy them so I'm going to spray paint some EMT (à la this tutorial) and add some finials you might recognize, but it's been too cold.

No curtain rods means no curtain reveal, but since my blog buddy, Crystal, (like my real, bi-directional blog friend who knows who I am) wanted to know how I made them I figure I can give you the run down on the sewing part of the process and how cheaply I made them.

I had been trying to figure out what I was going to do for curtains in the play room for a while. The room could seriously use some temperature moderation (it has two huge windows and no heating vents) and I knew eventually the light factor would be become an issue with Norie's 7pm bedtime. I found some king sheets on super clearence at Target and bought two sets (I checked the dimensions listed on the package and did some mental math to figure out how many I needed to make six 84" curtains). They were $11.38 each. I couldn't wait to chop them up.


I used Ana White's Tab Top Curtains which I've done before, but this time I added the blackout fabric. I got it for a steal too. No really, 60% off home decor fabrics at JoAnn's with a President's Day coupon. Since I needed 14 yards of the stuff and it usually runs $6.99 a yard I saved like 60 bucks.  My total was only $42.65 including tax. Woot! I bought so much they put it back on a roll for me and I had to unroll it on the living room floor to cut it.


I didn't have to make any changes to Ana's Tab Top Curtain Plan to line them. I just cut the blackout fabric into 84" sections and lined the curtains with them. To make sure I sewed the blackout fabric in the right place I folded the fabric over 5/8" (the plan says 1/2", but I have this thing about 5/8" so I guess technically I made a tiny change) at the top and sides and ironed it. Then I folded the top down 4" and ironed it to make a crease to follow.


When you unfold it will look like this.


I laid the blackout fabric up next to the crease line and even with the fabric I folded over so that it would be inside the finished edge, but not all folded up in the finished edge. Hopefully that makes sense. If not, let me know.


I took a close up so you could see what I mean.


Then I just folded the fabric over again around the blackout fabric and pinned and stitched it at like 1/2" because I'm a little neurotic and I like finishing seams like that to be 1/8" from the edge instead of a 1/4".


I did the same thing on the other side and just wrapped the blackout fabric in the same basic way in the top and bottom hems.


Sheets - $11.38 x 2= $22.76
Blackout fabric = $42.65
Thread (because I ran out and had to buy more) = $3.22

Total = $68.63

That's only $11.44 a curtain. Austin says I should figure in my time and they would become really expensive, but DIY is meant for people who have more time than cash, right?

Wednesday, February 27, 2013

Flat Wall Book Holders

Here's another flashback project post. I really love these shelves so I'm not exactly sure why I never posted about them. They hold a ton of books, fill some wall space, and we made them out of scraps from the Dream Dollhouses.


We used these plans from Ana White to make two 24" shelves and one 36" shelf. Yes, Austin helped with this building project. Usually I'm way to controlling to get help, but I was pretty pregnant at the time and rational choices had to be made. If only I was that functional all the time I we would probably get more done.


To attach them to the wall we just screwed them into the studs (after pre-drilling with a counter sink bit).

The whole project took maybe an afternoon and most of that was spent waiting for the paint to dry.

And yes, I'm prepping for a full nursery reveal someday soon. I'm shooting for before Norie's first birthday. :)

Tuesday, February 19, 2013

Valentine's Day Decorating: Retro Inspiration and Health Department Wisdom

Yeah, I know. Valentine's Day was last week. It's my blog and I'm posting about it today. There are still hearts up all over Norie's day care so I think it's okay.

Way back in December I got all inspired when I saw this image on Pinterest and I thought I could actually make something happen by Valentine's Day.

Source: Design Sponge - Beyond the Big Day Valentine's Decorating

That should be totally doable, right? I mean it's a bunch of stuff clothespinned to some twine and a couple of red chairs. I had been looking for a cute way to display the fabulous retro valentine's decor I squirreled away from my grandparents' house. I also had a very strong desire to randomly paint something bright red.

Did I get it done?

Nope; sure didn't. But guess what little tiny thing I did do?

I hung up some of my favorite valentines on the mini clip board wall I've also been meaning to post about. I got the clip boards when someone in my office cleared out a storage space and was giving them away and hung them up one Saturday afternoon in a burst of energy. I hear you can buy little ones in the frame section at Target if you're interested. 


That's it.

That's all I did.

It was really fun to go through old cards to pick out some valentines (I'm not the only one who keeps every card they get and stores them in boxes for decades, right?). I found some entertaining stuff including a copy of this brochure with a lovely Valentine's Day message from a high school friend.


I probably should have included it in my clip board wall art, but I had already finished it when I found this gem and it didn't go so well with the mostly pink theme I was rocking.

I have big dreams of decorating for holidays so Norie can have happy little memories of stuff like that. Good thing she doesn't really have much experiential memory yet. Maybe next year.

Monday, February 11, 2013

New Chalk Paint Recipe and a Desk Reveal

Several weeks ago I posted about the desk I worked on with my mom on Martin Luther King Jr. Day. By "worked on with" I mean painted while she busted her butt to sand and refinish the entire top. I didn't get it oiled and moved off the porch and back into the house until a week or so later. Ever since I've been meaning to move our desk stuff back into it and stage it for some glamor shots.

That's not going to happen in the near future and I'm working on being honest with myself about what I can actually accomplish and not starting new projects I won't finish.

I've come to terms with it. I hope you have too and you appreciate the poorly lit shots I took.

Before I show them to you I want to share my mom's new homemade chalk paint recipe. It is a MASSIVE improvement over the old one.

DIY CHALK PAINT RECIPE:

1 part HOT water
1 part plaster of Paris
3 parts paint

Mix the water and plaster and shake the bejesus out of it, shake it like a Polaroid picture, shake it like I don't know what, but shake it really, really well. Then just add the paint and shake it a bit more. It was the most amazing painting experience I have ever had in my whole life.

I mean that.

My WHOLE life.

Anyways, so those iffy, dark pictures of the amazing desk I promised you.


Someday you'll see some improved shots. Maybe when I add the room to the house tour.

Friday, January 18, 2013

Friday ReStore Finds

On Friday over lunch I like to stop by the ReStore and see what I can find. I took some pictures with my phone so you could feel like you got to come along.

There were oak chairs.


and this absolutely fabulous table. Guess what, Babe. I would even leave it stained, well at least the top. I might want to paint the pedestal.


I also found some potential options for a little project I've been wanting to work on for the entryway.  I saw this "Catch-All Shutter" from Life as a Thrifter and wanted to do something similar on the wall behind the door right as you walk in.

Source: Life as a Thrifter

It's this huge wall spot I've never shown you, but it's just door frame and then wall so furniture is not an option. At the moment it has a not large enough for the space wall hanging that is missing some hooks and makes me a little batty when I think about it.

So anyway, I've been on the prowl for some shutters, but I haven't found any in a week or two of Craigslist searching.

I saw these bifold shuttered doors and had the guy move two dishwashers so I could get a closer look then mulled over the idea of turning either of these into something like this for the entryway.


Would they be too tall? I have nine foot ceilings, but I also have about a foot of baseboard to deal with so they would be significantly taller than the door. 

The doors on this cabinet had potential, but they wanted something crazy for it (as opposed to the $5 a piece for the shutter doors).


I couldn't decide and I'm working on talking to my hubby before I make decorating decisions so I didn't buy any of them.

I even asked him about something I saw on Craigslist today. I'm really glad I did too. I thought he would like it but it turns out he didn't. Super glad I asked instead of getting it and being all proud of myself only to find out later he was not impressed.

I did walk out with some treasures though.


A new vent cover to replace the one that has been rusting out since the refridgerator installation flood and the personal cell phone number of the person who runs my local ReStore. I'm calling her tomorrow about some interior shutters for a whole different project.

Wednesday, January 9, 2013

Planning a Kitchen Remodel Using the 3D Model Warehouse in SketchUp

One of my house goals for 2013 is to figure out how to makeover our kitchen on a shoestring budget. Like we're talking it was in the 10 year plan and now it's in the 1 year plan and we need to pay for daycare shoestring.

In case you weren't around then, when we moved in the kitchen looked like this.


At some point I lost it and painted the whole thing white.


That made me happy enough for a while. I mean we didn't exactly have the money for a full on makeover and at least it wasn't dark and dirty looking. Then last spring when we started the dishwasher and smoke came out so we replaced it.

Then a couple of months later I noticed Norie's milk was going bad faster than it should and there was condensation and mildew on the seal of the fridge. We replaced it with this beauty we also found as an open item and saved like 50 percent off the retail cost.


It's gorgeous and awesome, but while it isn't that noticeable in the picture, it's way bigger than the fridge that was meant to be in that spot. Like six full inches wider. Like it sticks out six inches past the end of the cabinet above it and covers the frame of the door.

At the same time there are six inches worth of spacers in the bottom cabinets. As in the fridge would actually fit with the bottom cabinets if the spacers weren't there). It wouldn't fit with the top cabinets.

In short, the cabinets don't make sense and need to be moved around to sort the whole thing out. Ever since we moved into the house I got the feeling that they were mis-measured or installed in the wrong places and whoever installed them was just too lazy to fix it. They clearly weren't super professional given the wonky nature of their installation. Someone should have invested in some shims and clamps. I would really hate to plan my whole remodel around an appliance configuration and sort out electrical and plumbing and move the cabinets all around and then realize after it was all done that I hated where the fridge was. It would be a major bummer.

All of this is back story to explain why I needed to use SketchUp to figure it out. Need might be a strong term, but I have some major appliance placement decisions to make and I NEED to actually see it to know for sure which way makes the most sense.

I started by drawing up the whole thing most of it as is. I got a little bored and stopped once I finished all the parts I knew I would keep.


Here's what I'm thinking.


It's not done, but hopefully you get the idea. What do you think?

Tuesday, January 8, 2013

How Tuesday: Super Cheap Baby Name Nursery Wall Art


A couple of months ago I posted about my plans for wall art in the nursery. I've been meaning to post about this one for a while. It's one of my favorites AND I made for less than $2.

Yep. I said TWO dollars. I really wish I'd taken pictures throughout the process, but it just really didn't take that long or involve that many steps.

I picked the frame up off my mom's driveway several years ago. It's been waiting for me to put something in the middle ever since. My mom painted it with ASCP in Provence while she was here for Hibbs House Project Week back in March. That paint is super expensive, but it didn't take much. I'm figuring a dollar and I'm sure that's high.

I bought the cardboard letters at Hobby Lobby when they were 50% off. The whole alphabet was originally $4.99, so I got it for $2.50 and I only used 5 of the 26 letters, $0.48.

I glued a fancy sheet of polka dot scrapbooking paper I got for a quarter at a second hand store (it was a leftover from the Dream Dollhouse) to them. Then I remembered I should take a picture, a blurry one with my phone.


I wasn't sure what kind of ribbon to hang them from. Thank goodness for picture messages to my mom.

She was totally right about the yellow.

I hung the letters from the frame's wire with about two yards of ribbon I bought at Wal-Mart. Ten yards for $0.48. Let's call it 10 cents.

Total Cost: 1.00+0.48+0.25+0.10 = $1.77

Super easy. Super cheap. Super cute.


I really like it next to the piece I got from my sister for Christmas. :)

LinkWithin

Related Posts Plugin for WordPress, Blogger...